FAQ
Find assistance and support through our online knowledge base of commonly asked questions about our Luxriot Evo, Luxriot VMS security and video surveillance software , modules, camera support, product documentation and more
Luxriot Evo
- Is Luxriot Evo compatible with Virtual Machine (VM)?
All Luxriot EVO editions are compatible with VM environments starting from 1.13.1 product version.
- What password I need to use when making fresh install of Luxriot Evo software?
There is no password to use. Just leave password field blank and press “Ok”.
Luxriot VMS
- How to use DCZ keyboard buttons for switching user-defined layouts?
Summary
This post describes how to re-define DCZ keyboard buttons to make them switch VMS Client layouts.
Description
This feature requires that you have Luxriot VMS version 2.5.2 and newer installed, and can be applied either to the server computer, or dedicated client station, depending on your system configuration.
First, you need to create and save necessary camera layouts in VMS Client. (You can also add more layouts later).
– select desired camera arrangement using toolbar on the top or via right-click background -> Screen Arrangement
– drag and drop your cameras to fill the empty screens
– when done, right-click Layouts in the Structure pane on the left and select Save Current Layout
– enter a name for your layout, click OK to save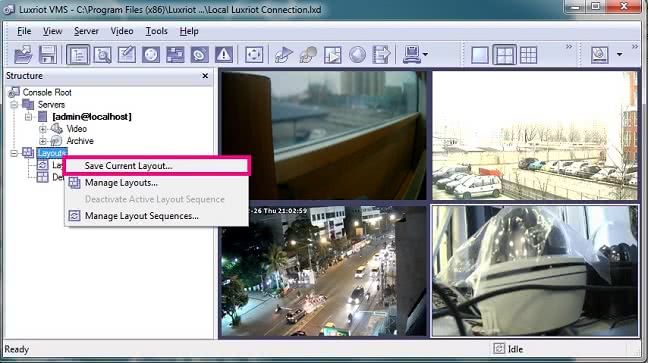
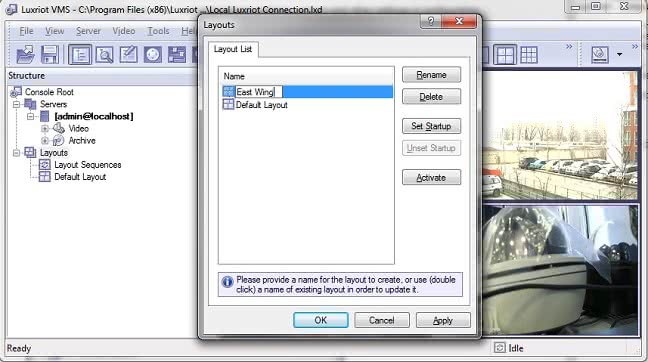
When layouts are ready, save your VMS Client state into a separate .lxd file via main menu File -> Save.

Next, create an INI file with layout configuration. (Any text editor capable of saving a non-formatted text – like Notepad or Notepad++ etc. – would do.) Remember to set file encoding to Unicode, especially if layout names contain Cyrillic or non-standard Latin symbols.
File name: Keys.ini
File structure:
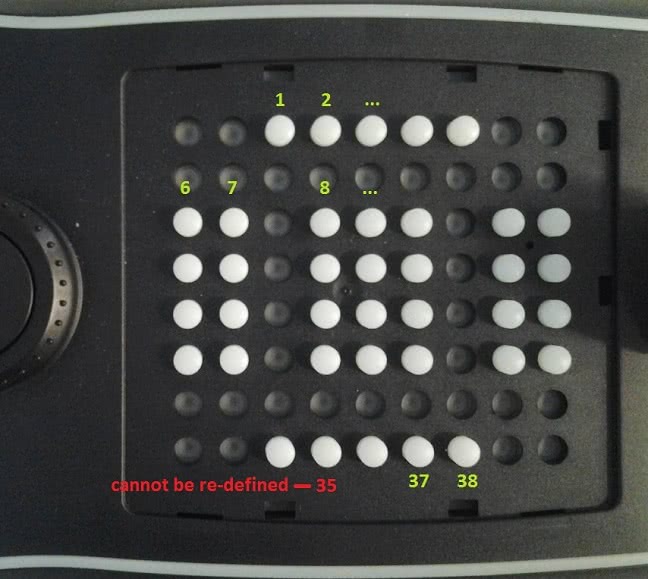
[Mapping]
1=test_layout
2=another_layoutYou can add up to 38 entries, each line representing a DCZ keyboard button (left to right, top to bottom). Note that key #35 cannot be re-defined (auxiliary key).
Buttons that originally have a function in Luxriot VMS Client (like Open Archive, call preset etc.) can be re-defined by assigning a layout. If such button has not been mentioned in the Keys.ini configuration, it will continue performing its original action.
Save your INI file in the Luxriot VMS installation directory. Default locations are:
C:\Program Files\Luxriot Digital Video Recorder (for 32-bit OS)
C:\Program Files (x86)\Luxriot Digital Video Recorder (for 64-bit OS)Run your VMS Client (or restart if it was running) and make sure it is in focus – just click once inside the Client window to make it active. Now you should be able to use your DCZ keyboard to switch layouts according to the mapped buttons.
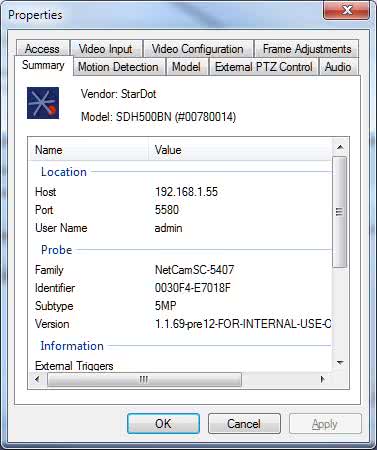
- How to add and configure StarDot Technologies IP cameras with Luxriot® VMS software to receive H.264 stream?
Summary
This post described how to add and configure StarDot Technologies IP cameras with Luxriot® VMS software to receive H.264 stream.
Description
StarDot H.264 camera models offer M-JPEG and H.264 over HTTP as access methods. RTSP is possible if the camera is set up as Generic. Below are the steps.
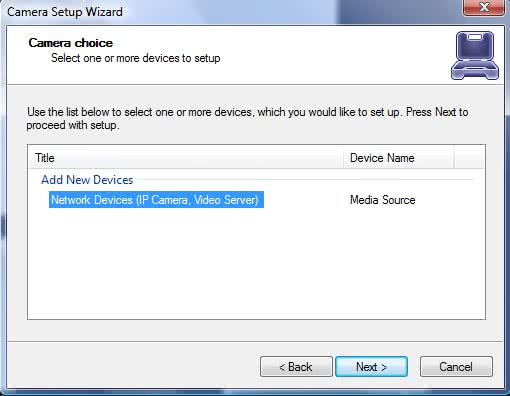
1. To start with setting up camera one needs to start wizard that sets up devices:
Complete it by adding new device and providing main parameters: name, IP address, port, model etc.
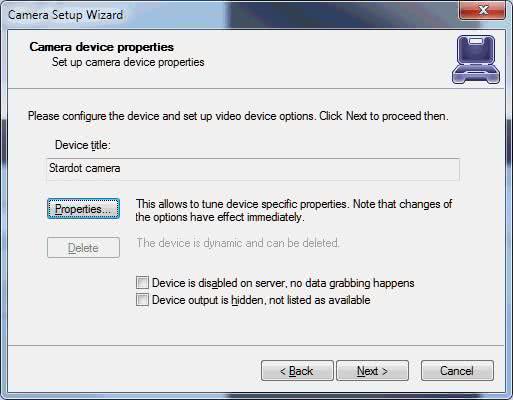
Here under Properties:
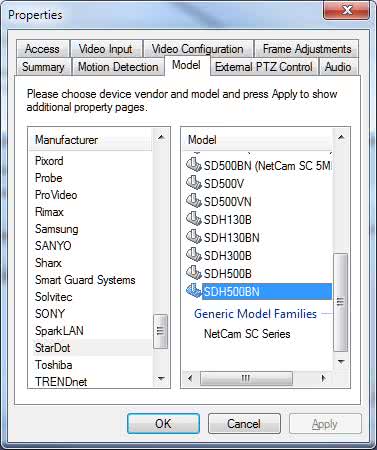
then Apply to show additional tabs
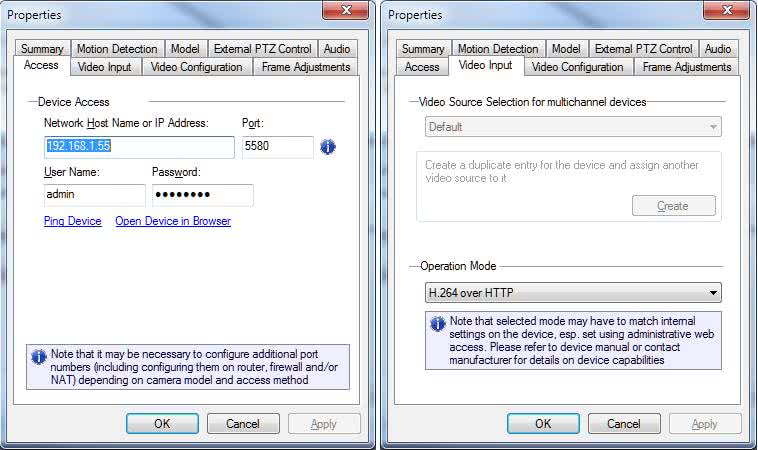
The latter window shows where you can choose between M-JPEG and H.264 over HTTP access methods.
Also, if everything is correct, Summary tab shows information about the camera:
At this point you complete the wizard setting other settings as necessary and the camera is set up.
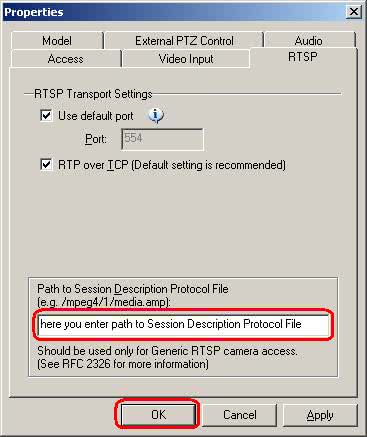
2. Should you want to use RTSP protocol as access method, the same sequence of steps is used with the difference that camera model is Generic, RTSP Compatible. The RTSP tab will provide a field for SDP path and it should be provided with “/nph-h264.cgi” there:
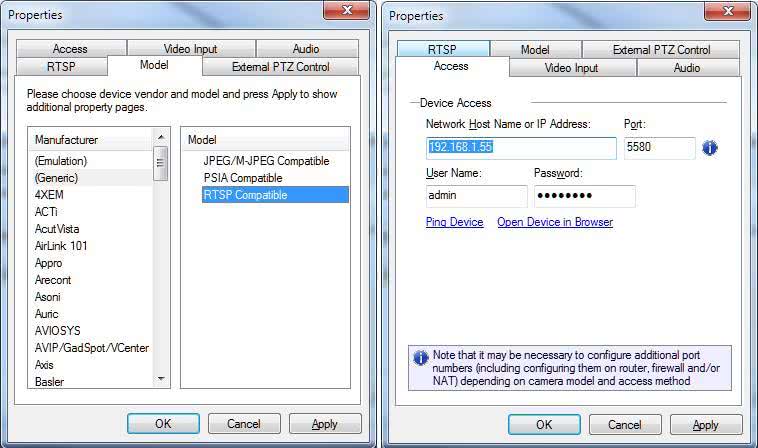

We deferred support for RTSP right under device model name due to the fact that we offer H.264 over HTTP as a choice.
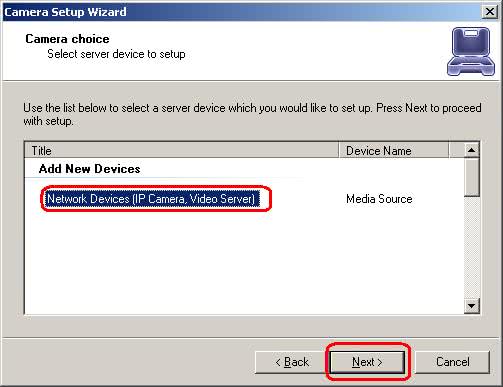
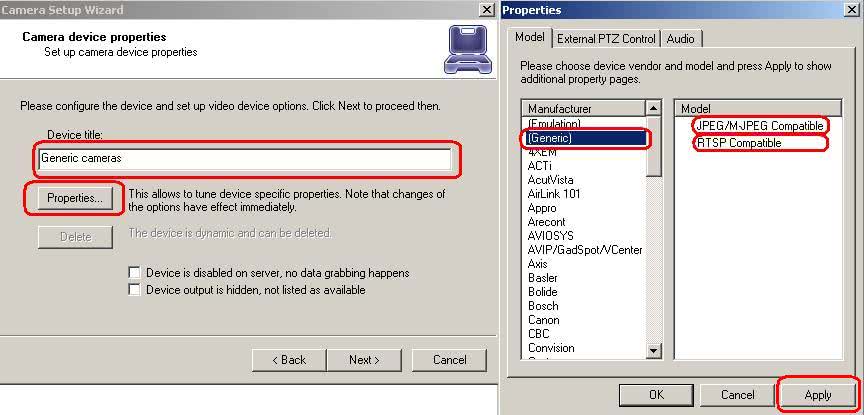
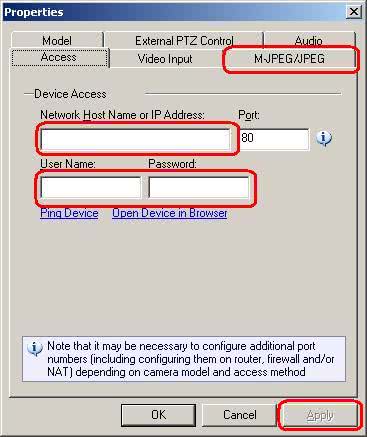
- How to add and configure Generic JPEG/MJPEG, MPEG4, H.264 cameras with Luxriot® VMS software?
Summary
This post describes how to add and configure Generic JPEG/MJPEG, MPEG4, H.264 over HTTP and RTSP cameras with Luxriot® VMS software.
Description
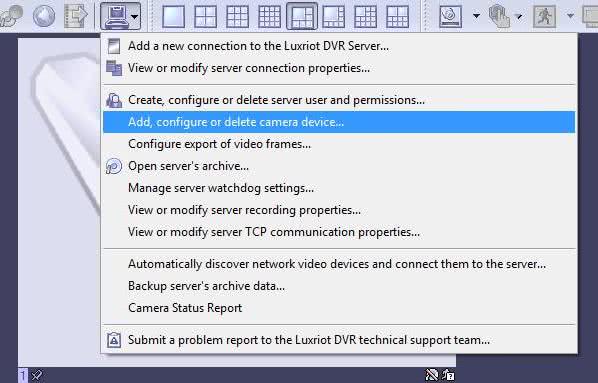
Once installed, with Luxriot® VMS Server and Client applications running and connected, a Camera Setup Wizard (prompted to be started automatically on the first run when no cameras configured) is used to add, configure or delete a camera:

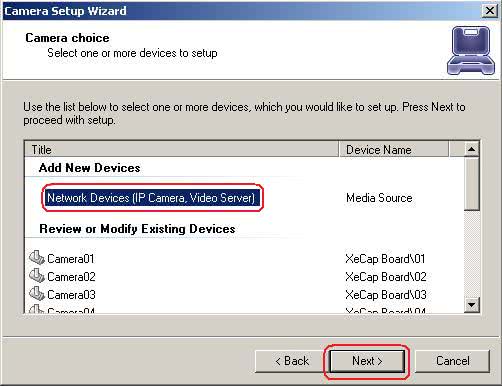
“Network Devices (IP Camera, Video Server)” option is adding a new camera connection:
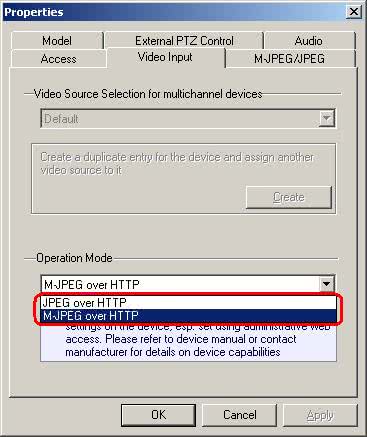
The Properties button brings property sheet with model selection, where selecting a proper model and pressing Apply button shows additional configuration options. For Generic devices supported JPEG/MJPEG video stream over HTTP you need select model “JPEG/M-JPEG Compatible”. For Generic devices supported JPEG/M-JPEG, MPEG4 or H.264 video stream over RTSP you need select model “RTSP Compatible”.
Fill in Device Access information for JPEG/M-JPEG Compatible or RTSP compatible camera.

For JPEG/M-JPEG Compatible devices you need select camera compatible operation mode. Select M-JPEG over HTTP or JPEG over HTTP, if camera support both we recommend HTTP based M-JPEG protocol, which allows getting full speed stream from the camera.
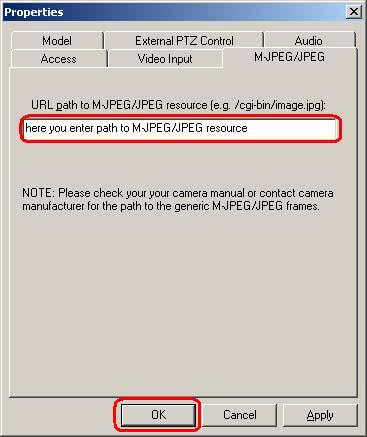
Fill in URL path to M-JPEG/JPEG resource for HTTP Generic compatible devices or for Path to Session Description protocol file For RTSP Generic compatible devices.
Completing the Camera Setup Wizard finishes configuration of Generic camera with Luxriot® VMS and allows Generic Support.
- Using USB Network Adapter as a “dongle” for Luxriot® VMS Server
Summary
This will allow you quickly transfer Luxriot® VMS server to a new hardware platform without contacting Luxriot® VMS support team for the key reset.
Description
1. This requires USB networking adapter or USB wireless networking adapter.
2. Install drivers for your USB networking adapter (before see device installation manual).
3. Download and Install Luxriot® VMS by following installation instructions.
4. Disconnect or disable all other adapters, if they are connected.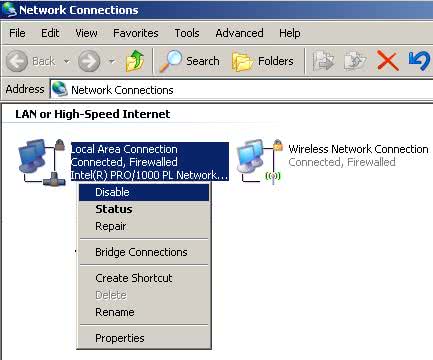
5. Connect to the Internet using USB networking adapter.
6. Activate Luxriot DVR using your unique License key by following installation instructions. Note: for registered version USB networking adapter must be always pluged in, without it Luxriot® VMS works with sharaware limitations only.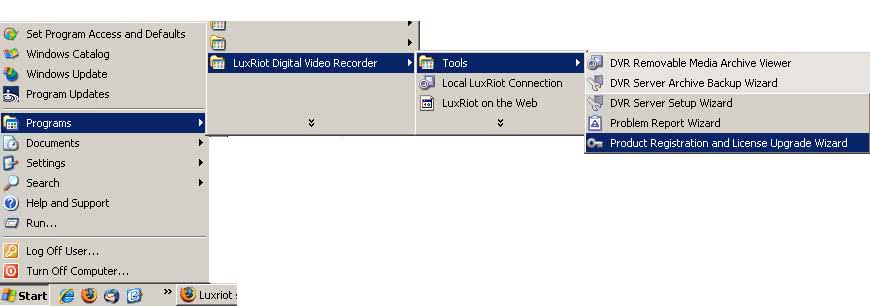
7. After you are ready migrate to new server hardware you need to unplug USB networking adapter from previous server and plug it to new one.
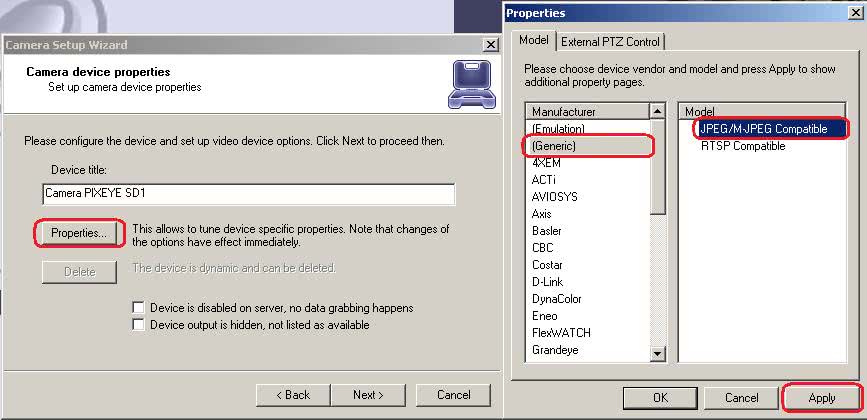
8. Repeate steps from 2 to 7 on new Luxriot® VMS server.- How to add and configure PIXEYE IP camera with LuxRiot?
Summary
This post described how to add and configure PIXEYE IP cameras SD1 and MEGA with LuxRiot DVR software.
Description
LuxRiot DVR software may be downloaded from downloads section on www.luxriot.com website. A trial/shareware version of LuxRiot DVR (before registration key entered) is subject to the following constraints:
- one camera may be active at a time, the rest of the cameras (if any) are auto-disabled; if any camera is re-enabled from GUI, it remains the only enabled camera in software
- server part of the software cannot be switched to Windows service mode, it can only be run as a regular Windows application
- remote connectivity is not enabled, to see remote connection in action it is possible to connect as a guest user (empty password) to server demo.luxriot.com
Registered versions constraints depend on LuxRiot DVR edition.
Once installed, with LuxRiot DVR Server and Client applications running and connected, a Camera Setup Wizard (prompted to be started automatically on the first run when no cameras configured) is used to add, confugure or delete a camera:
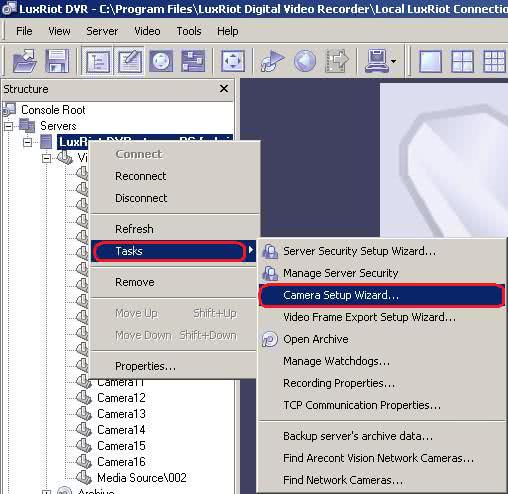
Add new “Network Devices” opion is adding a new camera connection:
The Properties button brings property sheet with model selection, where selecting a proper model and pressing Apply button shows additional configuration options:
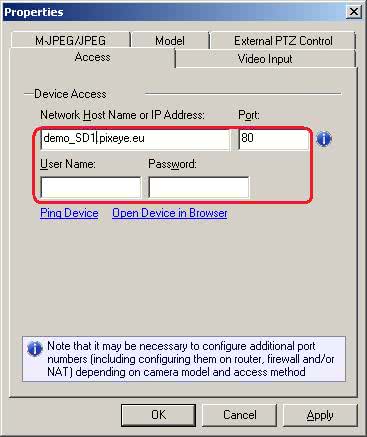
Fill in a Device Access information.
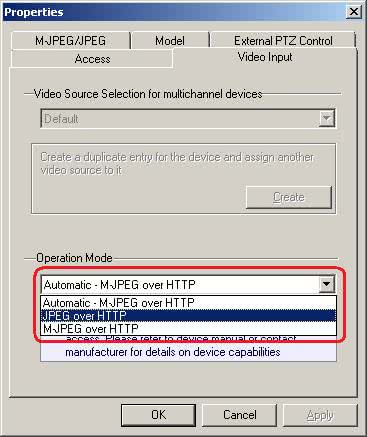
From the list of “Operation Mode” select M-JPEG over HTTP or JPEG over HTTP, we recommend HTTP based M-JPEG protocol, which allows getting full speed stread from the camera.
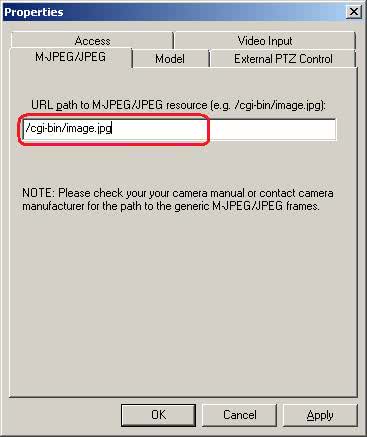
Fill in URL path to M-JPEG/JPEG resource. For selected in previous step M-JPEG fill in /cgi-bin/stream.mjpg, for selected JPEG fill in /cgi-bin/image.jpg.
Completing the Camera Setup Wizard finishes configuration of PIXEYE camera with LuxRiot DVR and makes the changes persistent.
- Third party software compatibility issues
Symptoms
There may be a number of compatibility issues with third party software, including the following most frequent:
- remote clients fail to connect to DVR server
- DVR server might freeze during operation
- DVR server might show poor performance
- there might be unexpected [temporary] files created while DVR server is running
Description
There has been a number of complaints of compatibility issues with particular versions of third party software, including:
- Microsoft Internet Security and Acceleration (ISA) Server
- Intel Active Management Technology (AMT) Software
- Kaspersky Anti-virus
- ESET NOD32 Antivirus
Most often the problem is related to network activity, both accessing LAN hardware such as network (IP) cameras and video servers and accessing network storage devices (NAS). Most often the problematic software package is antivirus software or software firewall. In some cases it is possible to configure third party software to avoid interference, e.g. adding exclusions on the processes and IP addresses.
In some cases, especially related to performance, it is possible to identify interfering process by checking task manager CPU load times and locating a non-DVR process that correlates in CPU load with LuxRiot DVR’s DVRServer.exe process. That is, once DVRServer is started, the other process also start consuming significant amount of CPU time; once DVRServer is stopped, the other process also gets into close to idle state.
A symptom which points out to compatibility issue in case of freeze of DVR operation is that it is impossible to gracefully stop LuxRiot DVR Server process (service or application), or even kill it with task manager.
Resolution
In order to troubleshoot compatibility issues, it is required to disable applications suspected in compatibility conflicts. Unfortunately it appears that it is insufficient to just disable many anti-virus packages through software and it is required to uninstall in order to truely resolve compatibility conflict.
- Conveniently transfer Luxriot® VMS Server settings to another server computer
Summary
Luxriot® VMS Server keeps video capture hardware settings, camera and other settings in configuration database which can be transfered to another computer when necessary or can be used to make a backup of and restore in case of crash, hardware failure etc.
Description
Luxriot® VMS Server configuration database file “Digital Video Recorder.mdb” is located in Luxriot® VMS installation directory, typically:
C:\Program Files\Luxriot Digital Video Recorder (for 32-bit OS)C:\Program Files (x86)\Luxriot Digital Video Recorder (for 64-bit OS)The configuration database contains configuration of server side objects such as cameras and recording. a backup and restore of the database may be useful to restore configured cameras if necessary, for example, in case of unexpected OS restart (caused by, for example, power outage) at the moment of writing to the database, which under certain circumstances may corrupt the database, or switch server configurations between multiple saved database files.
Server configuration is stored under so called instance name, which identifies Luxriot® VMS Server instance in case the database is shared between two or more Luxriot® VMS based servers. By default the instance name is the name of the computer on network (accessible through My Computer desktop icon, Properties menu item, Computer Name tab):
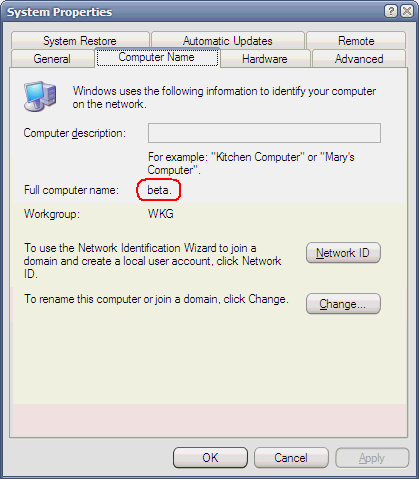
When the database is transfered to another computer it is required to either replace database instance name with a new computer name that hosts Luxriot® VMS Server software or specify instance name explicitly (override the default) via registry. Otherwise Luxriot® VMS Server will be unable to find its settings and create new default settings (that is based on local hardware with no remote LAN cameras).
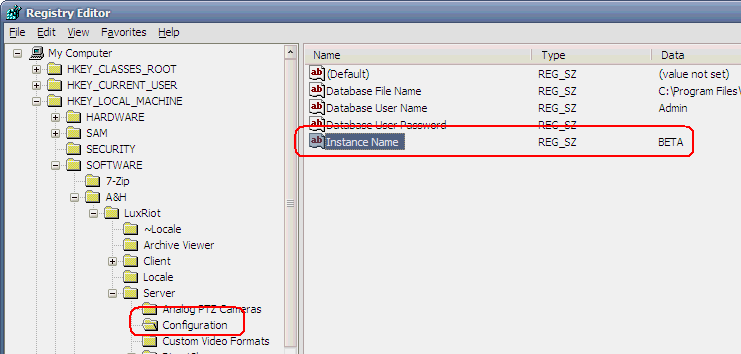
To override instance name via registry is is required to open registry editor at the key
HKEY_LOCAL_MACHINE\SOFTWARE\A&H\LuxRiot\Server\Configuration (for 32-bit OS)
HKEY_LOCAL_MACHINE\SOFTWARE\Wow6432Node\A&H\LuxRiot\Server\Configuration (for 64-bit OS)and edit value “Instance Name” (create new if it does not exist) and specify instance name of Luxriot® VMS Server where the configuration is copied/moved from (that is computer name of this server or registry value if specified as a registry override).
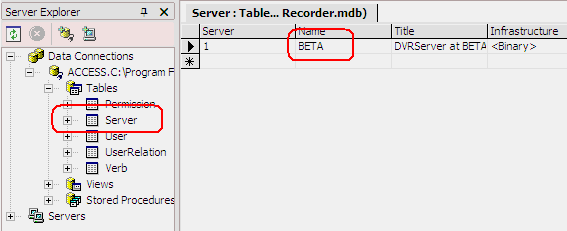
To replace database instance name in the database it is required to open or otherwise access the database using MS Access or a similar tool and edit field Name in Server table.
Once instance name is updated, Luxriot® VMS Server on next startup will use transferred or restored configuration settings.
- Blackness instead of live video
Symptoms
You cannot view live video from cameras, but you can record it. Also you can see and record video from another machine (with different hardware configuration) without “Black screen” problem.
To troubleshoot this issue you should select GDI renderer in client application settings (menu Tools, Options, Screen tab) and check if issue is gone.
Please remember that you should restart client application every time when you change video renderer settings in order to apply changes. Also remember that GDI mode is primarily for compatibility/reference purposes only, this mode turn off any hardware acceleration for video rendering, what results in significant performance degradation.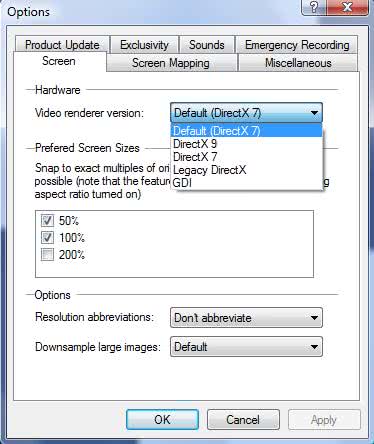
Resolution
This problem usually appears, when video adapter drivers aren’t fully compatible with the DirectX (actually with Direct Show). To resolve the problem you should try to install latest available drivers for the video adapter, and/or choose alternative renderer version (another DirectX version or GDI) to be used by LuxRiot for video rendering.
- Conveniently start two instances of Luxriot® VMS Client on dual monitor systems
Summary
Luxriot® VMS Client application saves and restores it’s position on the screen to make its use convenient when however single instance of the application is used. On dual monitor systems it is sometimes convenient to have two instances to run independently, for example, one instance is persistently running on secondary monitor and the other is started on demand on primary monitor.
Luxriot® VMS Client accepts a command line switch /InstanceNumber which allows to store window positions independently between different instances.
Description
To be able to use separate instances conveniently, a shell shortcut (desktop, quick launch etc.) and Luxriot® VMS Client configuration file (*.lxd) are to be created for each instance.
First, prepare configuration files creating a copy of the file or using File, Save As menu command in the application. For example, use Save As to create Primary.lxd and Secondary.lxd files under My Documents. Initially the files may be equal, it will be possible to customize the files later, such as for example configure startup layout.Second, create shell shortcuts to start Luxriot® VMS Client using specified instance number and configuration file. Use shell context menus (e.g. in Windows Explorer) to create a shortcut. The command line for the first shortcut will be (provided Luxriot® VMS is installed into C:\Program Files\LuxRiot Digital Video Recorder directory, Windows user name is John Doe and path to My Documents direcory may depend on operating system):
“C:\Program Files\LuxRiot Digital Video Recorder\DVRClient.exe” “C:\Documents and Settings\John Doe\My Documents\Primary.lxd”
The second shortcut will be:
“C:\Program Files\LuxRiot Digital Video Recorder\DVRClient.exe” /InstanceNumber:2 “C:\Documents and Settings\John Doe\My Documents\Secondary.lxd”
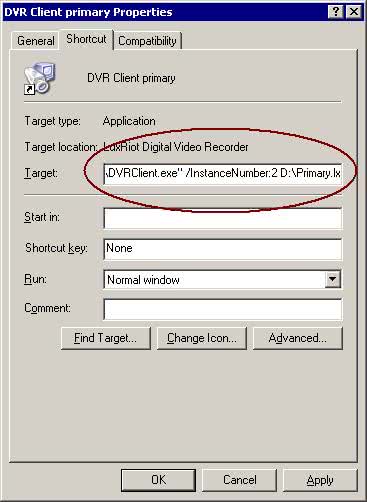
The /InstanceNumber:2 parameter instructs to use independent settings to avoid confusion with another instance. First shortcut will open client application with Primary.lxd configuration file and the second – with Secondary.lxd. Put application windows into desired positions on the virtual desktop (for example, drag second window to secondary monitor) and all window positions will be saved independently. Some of the settings (such as under menu Tools, Options) will remain be shared between the instances.
- Improve performance when receiving large images (typically 2 megapixels and larger) from network cameras
Summary
Large images from network cameras may be downsampled (reduced in size) before showing on the screen to improve system performance with no or minor impact on image quality.
Description
Network camera sometimes deliver large images (2 megapixels and greater) which are shown on the screen essentially reduced in size, for instance, 2048 x 1536 image (3 megapixels) displayed on 1280 x 1024 display in layout with 4 screens is reduced almost 4 times vertically and horizontally.
Depending on video adapter and its settings, this may create unnecessary load on system which can be reduced (in some cases significantly reduced) by pre-processing images received from camera.
Instructions
Change a setting “Downsample large images” in client application menu Tools, Options as shown below:

Settings “Enabled, Favor Quality” and “Enabled, Favor Speed” enable the feature. Note that the change has effect with reactivating broadcast from camera. Reconnect to server or restart application to make sure the change has effect.
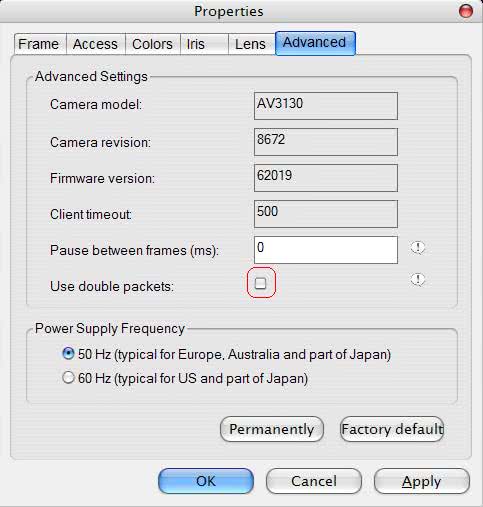
- Low frame rate of Arecont Vision network cameras
Symptoms
Under certain circumstances Arecont Vision network cameras may produce low frame rate (FPS).
Resolution
Typical low frame rate issues and workarounds for Arecont Vision network cameras are:
- Arecont Vision network cameras are not designed for concurrent access. So frame rate will slow down dramatically if two or more users are watching video from the same camera at the same time. Beside this Arecont Vision Network Camera Search Wizard in LuxRiot DVR will not find the camera if this camera already transmits video to some user.
- Arecont Vision megapixel camera consumes large traffic while operating, e.g. AV 3130 camera in max quality mode consumes approx. 20Mbps. Certain network equipment have been noticed to create image transmission problems or slow down frame rate. For example, 3Com routers are not recommended. To bypass network transmission problem try to disable “use double packets” (Advanced tab). This feature specifies whether to use data packets with 2KB instead of the regular 1KB for image transmission (by default, 2KB). This allows increasing image transmission bandwidth, but may lead to a less stable performance on overloaded networks.
- How to submit a problem report from machine not connected to Internet?
The Problem Report Wizard (can be started from Start Menu –> Programs –> Luxriot Digital Video Recorder –> Tools –> Problem Report Wizard shortcut, or from Luxriot® VMS DVR Client menu) gathers information about past Luxriot® VMS errors and system and submits it to Luxriot website automatically.
When Luxriot® VMS is running on machine which is not connected to internet, it is still possible to compose the report so that it can be copied to machine with Internet connection and submitted manually.
To create report, start Problem Report Wizard (shortcut location mentioned above) and pass it up to the page “Report Text – Review prepared report text“, see screenshot below.
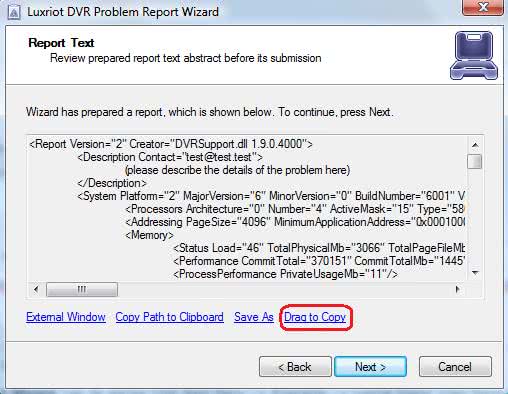
The page provides “Drag to Copy” link which needs to be dragged using mouse to email client application, file manager application such as Windows Explorer etc. When dropped, a new file with .ZIP extension will appear. Send this file via email support@luxriot.com to Luxriot® VMS support.
View also
Notes
For users. In case you didn’t find answer in our wiki nor using search please use Technical support form.