Control Room Video Wall
So, here comes your huge CCTV installation. With a control center and a lot of displays in there. And you strive for a natural and ingenious management tool; for, without it, controlling the video wall may turn into a nightmare. EVO Global software suite offers an easy-to-use video wall solution, which takes minutes to set up and seconds to learn to drive it.
In this article, we focus on the Luxriot EVO Global video wall capabilities and see how it can be applied in any control center, operators' room, or dispatcher office.
Flexibility Above All
Video walls in EVO Global can be thought of as virtual entities. Apart from matching the video wall layout to the actual display arrangement, a single video wall can unite physical displays from different workstations across the world. This enables you to manipulate the contents of many no-matter-how-remote displays from a comfy lounge chair in your garden in no time at all. Monitors connected to the same computer may belong to different video walls, if required, for example, for sharing video wall administration permissions between different people.
Video walls are created via software configuration UI — EVO Console — and then managed via client — EVO Monitor application. EVO advanced user management enables you to grant separate permissions for administering (creating, editing) and controlling (setting contents) video walls and video wall groups.
Contents of the video walls can be:
- pre-defined as static layouts,
- shared immediately from any EVO Monitor connected to the same EVO Global server,
- assigned by the video wall supervisor,
- set to appear automatically based on motion, VCA or any other external event (not covered in this article so come back and check future topics!).
To assign the contents of the video walls, you just need to be connected to the same EVO Global server — no matter where you are. You do not need any physical control over the video wall machines. Nor do you need to be a part of the same video wall: from your workplace, you are in control of all video walls in the EVO Global system. (Naturally, you would need corresponding permissions). We do not imply any license limitations on the number of your video walls in the software - create as many as you need for no extra fee!
3, 2, 1, and Off You Go
EVO operates through Windows API and uses it to its advantage: the software works with the system display arrangement, allowing you to create new application windows with a single click. Once you have installed the EVO Monitor software and configured video walls, all the management is done on the software level, relieving you from the necessity to use mice and keyboards every time a change in the layout is required.
If you wish to combine several physical displays into a single one, you can set it up using a third-party driver. Simply configure it so that the array of monitors appears as a single display in Windows Control Panel: once it does, EVO Monitor will also be able to work with the "big screen" as if it were a single display.
So, how do you employ EVO Global video walls? A few simple steps and you are all set:
- In EVO Console, create a video wall with your desired display layout
- Install EVO Monitor on each workstation that is a part of the future video wall
- Run EVO Monitor and open secondary application windows on all necessary displays
- Assign EVO Monitor windows to the video wall displays
- Grant permissions for your video wall supervisor
- Let him sit back, relax, and administer the video wall from anywhere
Within each workstation, you can dedicate some displays to a video wall while leaving others to be local only, or assign these displays to several different video walls. The display layout may conform to the actual (physical) display pattern. Another approach, as mentioned earlier, is to create a virtual video wall that will include displays from different locations.
Though, at this point, let us consider a case where the video wall is aligned with the physical display sequence — a perfect case study for a control room.
Build the Wall
To create a video wall, simply open your EVO Console and go to the Video walls section under Configuration. You will need an administrative account for this, or at least a permission to manage video walls enabled in your user's Administration profile (which also automatically lets you log into EVO Console).
On the top panel, click the + New video wall button: a dialog box will appear, allowing you to create the desired display arrangement. Each cell within the layout is a single physical screen, as it appears in the Windows Control Panel.
First, select the grid size — the maximum number of displays vertically and horizontally. Up to 20 per row/column and up to 100 displays in total!
Then, use the Merge and Remove buttons to fit the monitor size and remove missing or non-existent displays. Apart from the index number, each display can be optionally assigned a name - based on the camera type, location, or other project-specific attributes. Both display numbers and names will appear in the EVO Monitor application. Thus, you identify where a specific display belongs to with just one glance.
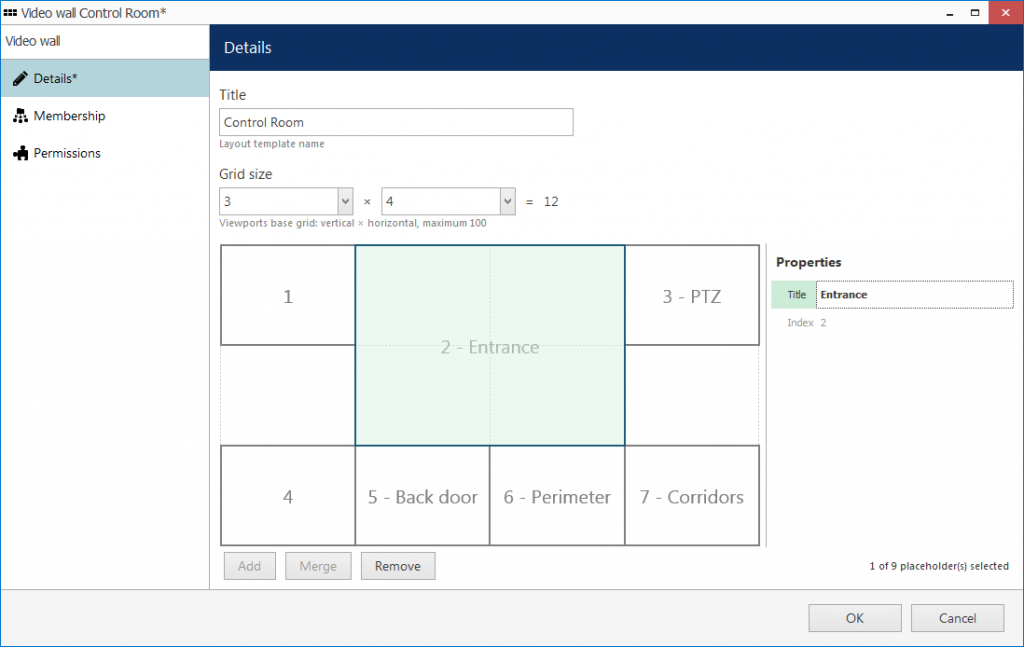
Create your desired layout with the video wall constructor
After you finish and hit OK to apply the configuration, it will be immediately saved into the database. All connected EVO Monitor applications, as well as the central server mirror, will be notified that the video wall functionality is now available. But do not close the dialog box yet; let's see how you can restrict access to the video wall management.
Control 'Em All
Using the same administrative account for client access would be a security breach. So, first of all, set up user access to the video wall in the EVO Monitor application: choose, who will supervise the video wall and manage its contents. And then, teach your staff these several steps for the video wall management!
Access Control
While still in Console with your video wall opened for editing, go to the Membership tab. Here, you can choose if the video wall will belong to a video wall group. Grouping facilitates permission handling, and we suggest that you do use groups if you are dealing with a great number of users. Further, the Permissions tab lets you grant the user access to the video wall or video wall group, for that matter.
There are two permissions: to view and to manage the video wall.
- The permission to view lets users connect to the video wall via EVO Monitor and retrieve its contents; also, this allows them to assign application windows to video wall displays.
- Users authorized to manage the video wall will have full control over it in the Video Wall tab in EVO Monitor, plus the ability to log in via Console and change the video wall layout.
So, the first permission is required for the user to see the video wall contents — if the permission is missing, displays belonging to the video wall will appear blank. The second one is necessary for supervisors, enabling them to manage the video wall structure and filling.
Now that the video wall layout is ready and access to it is secured, let's see how it can be supplied with contents.
Video Wall in EVO Monitor
Visualization is always far more interesting than pure configuration, so here comes the exciting part :)
Open your EVO Monitor application and connect to the Global server. In the Live mode, click the ![]() Multidisplay setup button in the upper right corner of the application window (right beneath the main menu) and then open advanced settings.
Multidisplay setup button in the upper right corner of the application window (right beneath the main menu) and then open advanced settings.
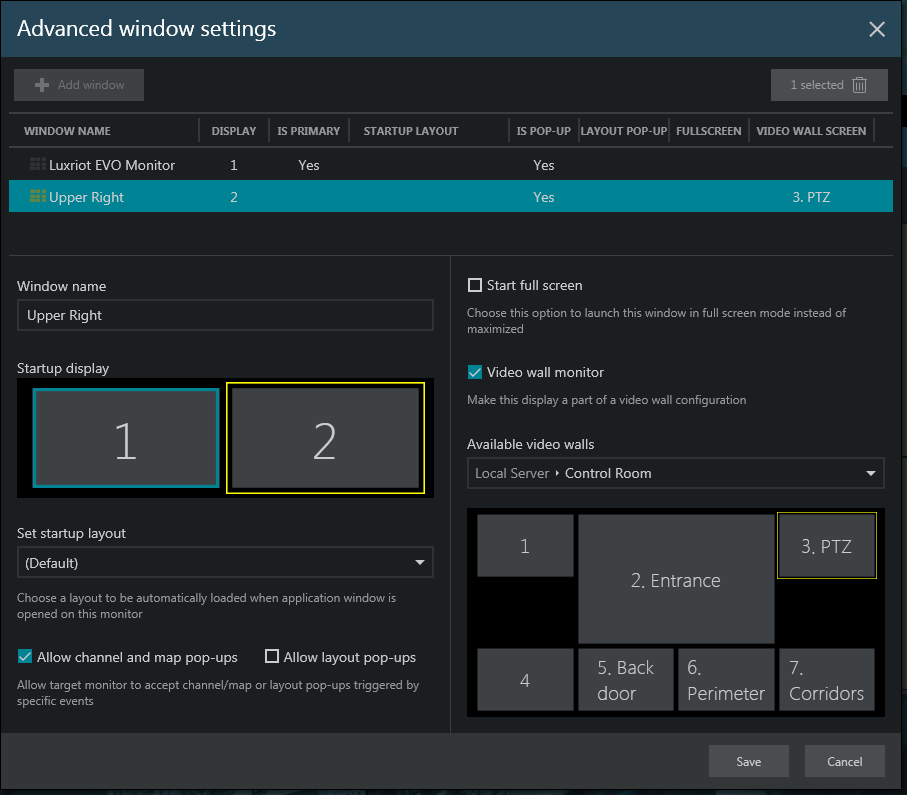
Assign application windows to video wall displays
You will see the layout of local displays here: for each one, you can create a new application window and make it a part of the video wall. This is also the place where you define startup layouts for each window: it will be loaded automatically once the EVO Monitor application is launched.
Now every EVO Monitor window "knows" it is a member of the video wall: this information appears in the application title bar.
Once the preliminary setup is finished, there are three ways how to set the contents of the video wall from the EVO Monitor interface:
- from the resources list on the left, click the
 Advanced button next to the channel, map, layout or layout sequence name and choose the target video wall display: the item will pop up immediately on the first empty viewport (maps, channels) or replace the current contents of the target display (layouts and sequences),
 - similarly, use the
 Screen contents button in the upper right corner of any EVO Monitor window to share its current state with any video wall display (without having to save the layout),
 - finally, switch to the Video Wall tab to have full control over all video walls.
Supervising Your Video Wall
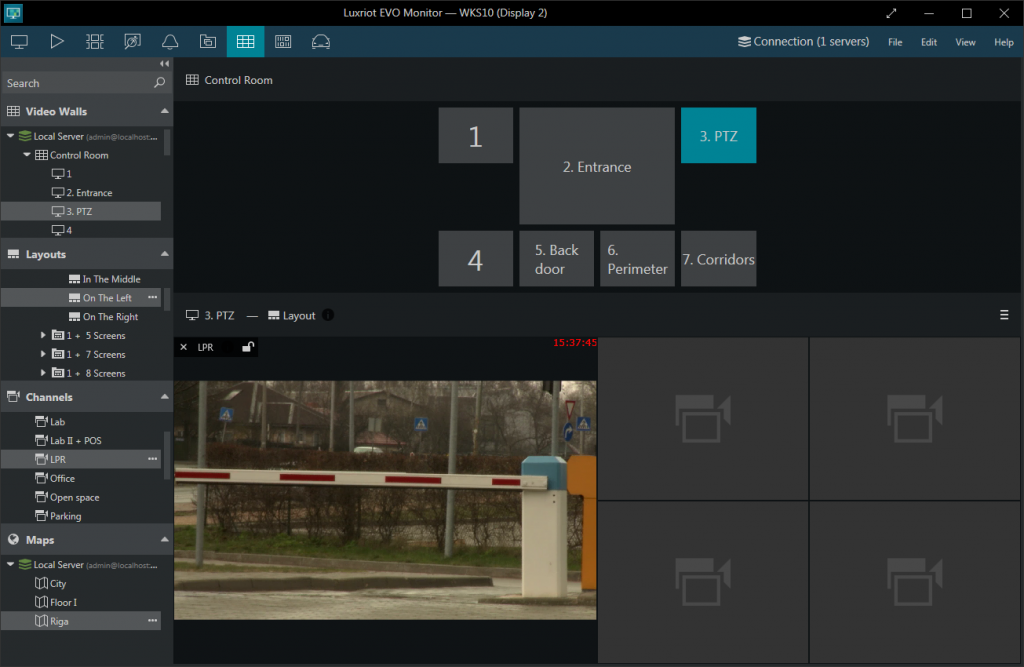
Let's switch to the Video Wall tab. Controls here are intuitive:
- drag and drop the desired video wall onto the upper section: video wall layout preview will appear there,
- pick a screen by clicking on it: current display contents will appear in the lower section,
- fill the target display contents: drag and drop resources from the list on the left.
You can either select empty layout templates and then populate them with channels and maps, or pre-define layouts and then use them for video wall displays. Layouts can be either local or shared via Global server.
EVO Monitor provides full control over your video walls
There are several small but important things that will facilitate the process:
- alike in regular live view, each viewport has a lock overlay control: use it if you wish to prevent certain viewport content to be replaced by other channels and maps popping up,
- use the Screen contents button in the upper right corner of the preview area to set the current display layout as the startup layout,
- if someone else is managing the same display at the same time, an
 information sign will appear next to the channel/map name: hover your mouse cursor over it to learn who placed this contents.
Some other overlay controls, such as PTZ and digital PTZ, are also available in the live preview for your convenience.
Every change you make here is immediately reflected: there is no need to save or apply.
City Council or Shopping Mall
The setup process described above is equally suitable for any type of the control room video wall. Be it a hospital, a shopping center, a city surveillance, or an airport security control center, we will ensure that you have the best experience with the EVO Global video wall solution.
To finish with, here is a real-life video wall example from the control room. Easy to configure, convenient to use. Feel ready to try yourself?
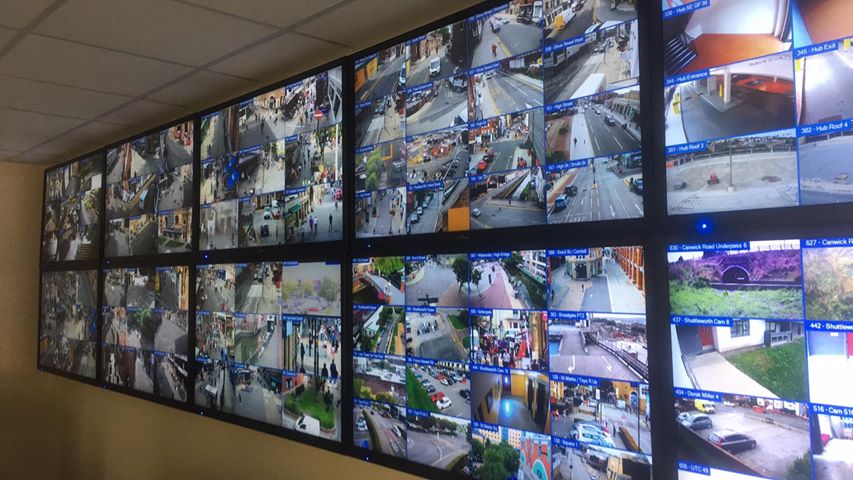
Photo provided through the courtesy of our partners in UK, Videcom Security Ltd


