Split a Single Data Stream Between Channels
Starting from software release 1.5.0, Luxriot EVO servers can accept serial data streams via TCP/UDP or COM ports. This means, you can configure any third-party device or service, either remote or local, to send its output data for further processing: EVO will then be able to display it as live and recorded video overlay, as well as provide textual search and automatic scenario setup based on pre-defined keywords appearing in the data stream.
While the Data Sources feature allows you to receive various kinds of information – e.g., textual data from intercoms, vending machines, IP cameras – the most required and popular use case is receiving transaction data from the point-of-sale (POS) systems. In this how-to, we will consider an example where data from multiple POS sources is received through the same UDP port and then distributed between video channels based on the POS identifier.
Generally, the plan is as follows:
- Set up a Data Source to receive the serial data (let us consider that it has been pre-configured on the third-party side)
- Configure a Data Source Profile for that data source to define how the information is parsed
- Define based on what the data will be split between channels
- Choose two video channels for the external data to be bound to
- Align the data overlay for each channel
You will need a pre-configured serial data source (POS) and Luxriot EVO console with administrative access, as well as pre-configured channels, which will be used for the POS data overlay.
Having gone through these steps, you will be able to see the transaction data overlaying live and recorded video, use text search to find specific items and see individual receipts, export search results into a CSV file, and also export video clips from the archive with the POS data overlay (MKV+VP8+hard subtitles export settings should be used for that).
To get started, please log into your EVO server using the EVO Console management application under an administrative user account – either use a root admin profile or make sure your user has administrative privileges to manage data sources and device channels, as well as resource permissions to receive live video and external data for the target channels.
Set Up a Data Source
In EVO Console, go to the Configuration section and choose Data Sources in the left-hand menu: here, use the New data source button to start creating a new entry. The data source setup will help EVO server understand how the POS information is delivered.
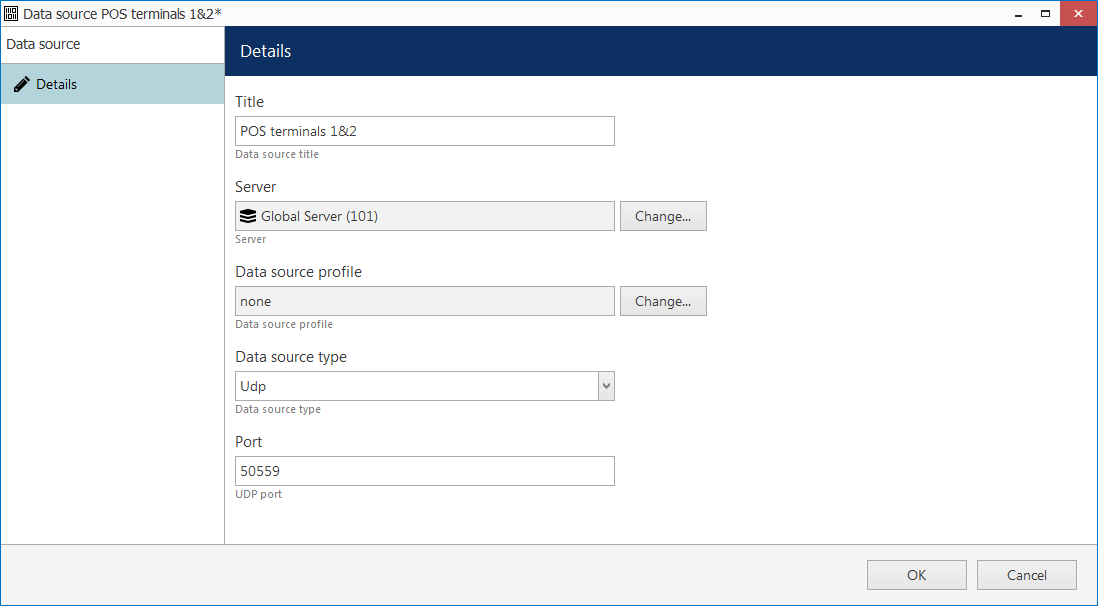
Data source setup for UDP mode
In this example, we will use UDP as the data delivery method; TCP and COM ports as data sources are configured in a similar way – the most important thing is to match the protocol settings in EVO with those on the POS terminal side.
Leave the Data source profile setting empty at this point and save the entry. It will be marked red on the list indicating that not all the settings have been defined but we will get back here later.
Create a Data Source Profile
Now, create a new data source profile by selecting the corresponding option from the drop-down list next to the New data source button. Details tab is easy – you just need to specify the profile name here; when done with that, switch to the Configuration tab, where it is possible to define how the delivered text should be parsed.
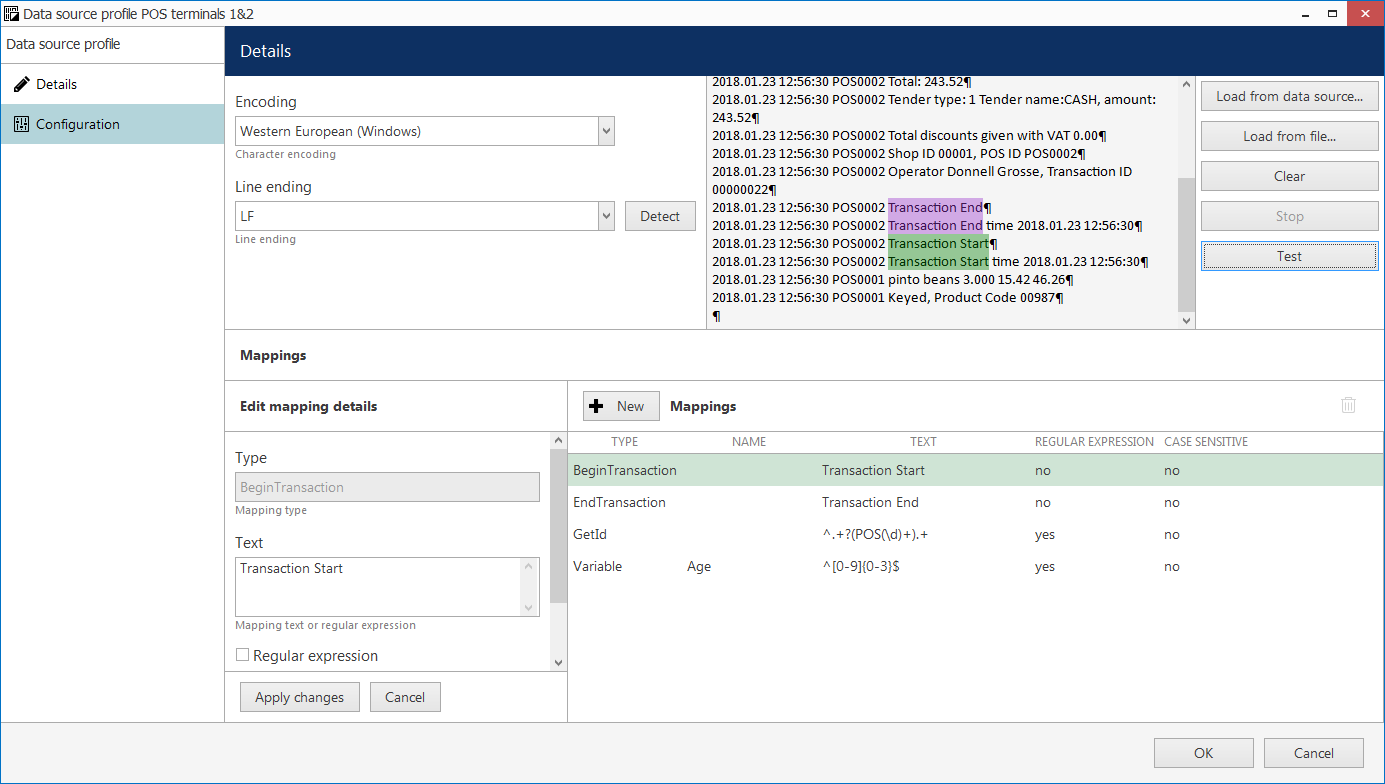
Data source profile setup
Here, click the Load from data source button in the top right corner and select the data source that was created on the previous step. If the data source is active and has been configured correctly, you should see the lines of text appearing in the text preview window. Click Stop when you have enough text, i.e., when there is text from both terminals and there are start and stop lines for the transactions.
- Check the settings on the POS side and make sure to select the correct encoding setting. If the encoding is incorrect, you may see mojibake instead of the expected data: in this case, double-check the source and destination encoding once again.
- Default line ending (Line Feed, Carrier Return or both at once) can be detected automatically. You can also use custom delimiters (single character or symbol combination) if your serial data does not have standard line terminators. It is necessary to define the line ending for EVO to split the text into lines correctly, as all the further operations with received text will be made based on lines of text.
In the Mappings section, specify the first and the last line of each transaction by using the built-in BeginTransaction and EndTransaction mappings: these will be used to split the POS data into separate receipts. If the first/last line contents may vary (e.g., include a unique ID), use regular expressions. To specify the start and end for the transactions, you can also select (mark) the required part of the line in the text preview window, right-click it and then choose Transaction start or Transaction end. Copying and pasting the text into the corresponding fields works as well.
Set a Data Stream Identifier
The data stream we have here contains text from two different POS terminals, each of them having a unique ID – in the snapshot above, these are POS0001 and POS0002 in the beginning of each line. Theoretically, there may be more than two identifiers in the same format. We will use the GetID mapping in the Data source profile configuration to describe this ID pattern: this mapping is defined in the regex (regular expression) format and exists by default, so we only need to enter the correct expression.
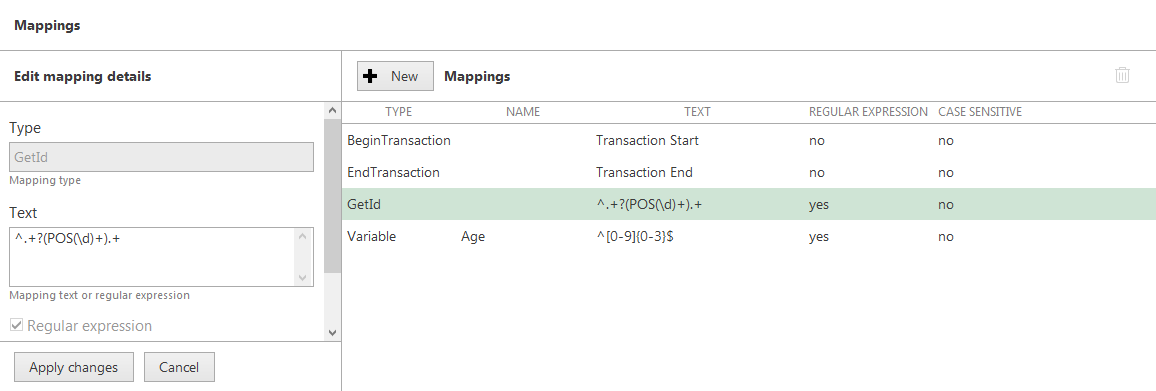
Data ID defined by the means of a regular expression using the GetID mapping
In our case, the regular expression ^.+?(POS(\d)+).+ defines that we expect a line in the following format:
- some number of any characters (except for line terminators) – the timestamp before the terminal ID,
- then, the literal
POScharacter combination, - then followed by a group of digits of any length,
- the whole thing then followed by some number of any characters again.
You can also define the length of the expected digit substring or modify the regex expression according to your needs. Later, in the channel settings, we will set the exact ID to be assigned to that channel, so this regular expression in the GetID filed allows us to separate the data from different terminals and split it between two (or more) channels.

Assign the newly created profile to the data source
To check if the regular expression works as expected, use the Test button on the right side: the lines present in the preview area will be analyzed and you should be able to see something similar to what is displayed in the snapshot here – the Data ID field for each line should be displaying the extracted identifier.
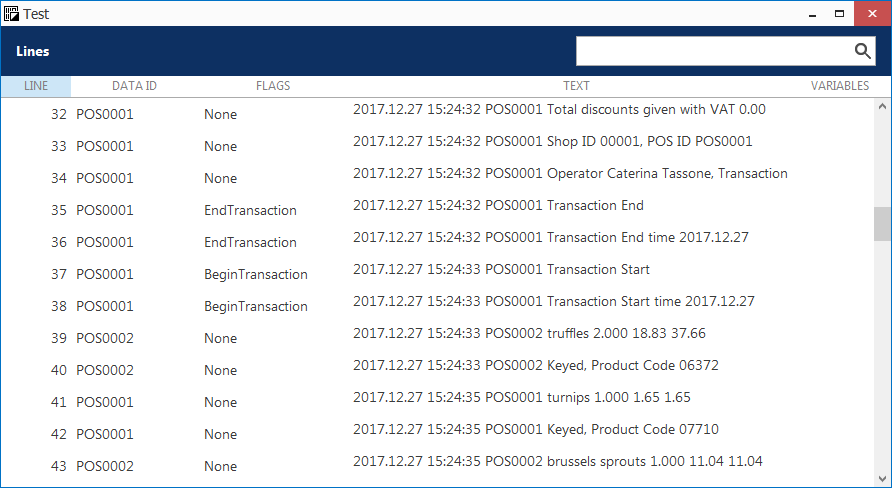
Test your data source profile settings
Now, save the data source profile, then open the data source created in the previous step again and set the newly created profile as the target item in the Data source profile field. After you save the data source, it should not be marked red in the list anymore, meaning that all the settings are defined.
Define the Data ID in the Channel Settings
When both the data source and the data source profile have been created, it is time to define the actual data source ID for each of the channels. In order to do so, go to the Configuration section in Console and then choose Channels in the menu on the left; double-click the first channel, which you wish to assign the serial data to, and switch to the Data Source tab.
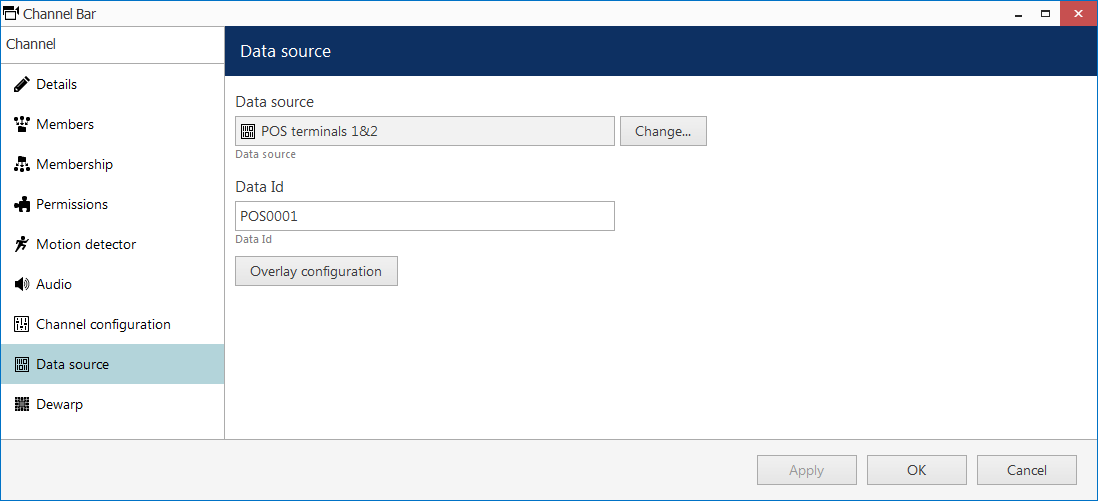
Set up the data source ID
Here, choose your newly created data source and then insert the actual POS ID into the Data Id field, then save. Repeat this for the rest of the channels, each time specifying the unique data source ID, which should be assigned to the chosen channel.
Define the Text Embedding Settings
Next, press the Overlay configuration button in the Edit Channel dialog box to access the text layout for the chosen video stream: here, you will be offered to set the text output area, as well as the data presentation settings.
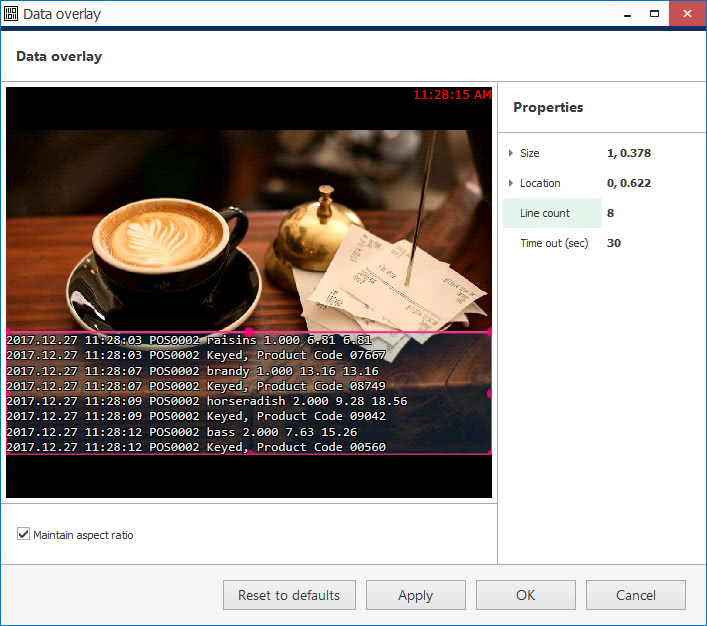
Data overlay example
Drag the pink frame to change the output area (note that this field cannot be larger than the video stream itself). The height of the text lines will be adjusted automatically depending on the output area size and the number of the lines. On the right side of the dialog box, you can set the desired number of lines per output area and also define the time period in seconds for each line to stay on the screen. Repeat this for each channel that has external data overlay.
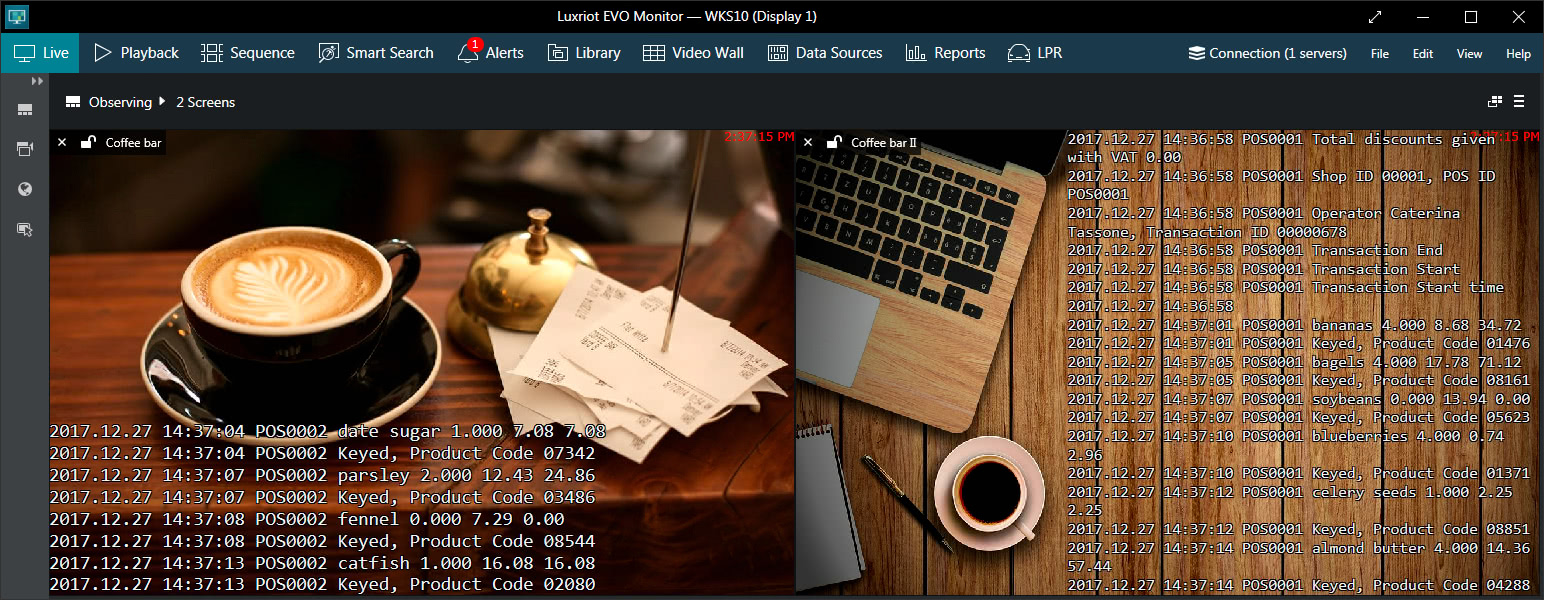
The result of splitting POS data into two channels in EVO Monitor
Now, you can go to the EVO Monitor application and see the results of your configuration :)


